1996-03-19
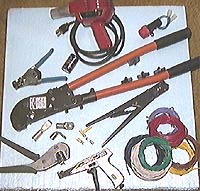
Wired toolsSlowly putting in some extra time on the EV. I did a little touchup welding, sanding, and primer painting on all of the battery box frames this past weekend. I've also been in acquisition mode for the past few weeks, gathering parts and tools to do the brunt of the wiring. I have a friend who now owns about every crimping tool you can think of: this is very good. So I've been sorting through them, finding the ones I need. In the photos below you'll see what I have to work with so far plus some of the connectors needing crimping. There's the BIG lugs with the BIG crimper for the main battery cables: it takes some force to crimp those puppies. At times like these a fellow almost wishes for the leverage of a beer belly!
I've thrown a D cell battery into the picture so you can have some perspective on the relative size of everything. In the upper right you can see that inertia switch I've been talking about. There's a bunch of 14 and 16 gauge wire, a couple of small crimpers, and a tie wrap gun. You could get away without using some of these, but it sure is handy to have the right tool. The heat gun is used on the heat shrink tubing (not shown).
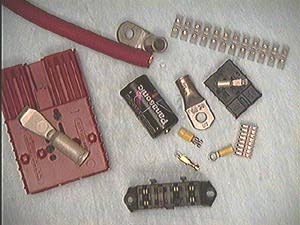
Now here are some of the connectors we'll be dealing with. The big red connector is an Anderson SB-350, which will be on the main battery pack/motor feed lines. There's a smaller Anderson SB-50 (black square towards upper right) which is for heater and DC-DC quick disconnects. The big red garden hose coming into the picture from the upper left is actually the battery cable, or 2/0 gauge as the wire guys would call it. You can judge the size of it and its nearby connectors by the D cell battery in the middle. The black rectangle towards the bottom center of the photo is a fuse block. It holds four fuses and the connector it uses is the small gold one right above it. The connectors with the yellow plastic insulators will be used for medium current stuff: heater relay, DC-DC, etc.. Just to the right and kind of the hard to see is one of the pin connectors for the Zapi control wiring. Finally there is an interconnecting wire block in the far upper left that is almost invisible, I'm planning on using this as a junction point between the rest of the on and off board circuits. Luckily my friend has lots of wiring in a rainbow of colors so I can keep the individual circuits seperated and visible by coloring. There are a couple more things I need to do before I commence to wiring: make a contactor mounting bracket and then mount the Zapi and contactors to the electronics board. Oh, I also need to find or make some copper buss bars for the really short runs between adjacent contactors. Next: Tube and Wire |
© Copyright 1995-2002 Jerry Halstead